Sentinel-1A with SNAP
1. Install SNAP
Choose All Toolboxes ~ Windows 64-bit (check your system)
In SNAP, Tools ~ Options ~ Performance ~ Compute
2. Download Sentinel-1A Data
2.1. For seamless download, use FireFox web browser ( https://www.mozilla.org/ko/firefox/new/ )
2.2. Download Sentinel-1A Dataa. Sign up and login to https://scihub.copernicus.eu/dhus/#/home
b. Choose a rectangular area
c. Product Type : Choose SLC (single look complex )for InSAR
d. Sensor Mode: IW (Interferometric Wide swath - default mode for S-1A)
e. Search and Download (2~3 hours per scene if lucky)
f. Check data with SNAP:
(File ~ ) Open Products : select a *.zip file
Double click (Product Explorer ~ Bands ~) Intensity_IW1_HH, etc. to check data.
Run (Radar ~ Sentinel 1 TOPS ~ ) S-1 SLC to GRD to check data.
3. Sentinel-1A TOPS Interferometry
a. (File ~ ) Open Products : Select two *.zip files for InSAR
b. (Radar ~ Coregistration ~) S-1 TOPS Coregistration : (5~7 minutes for each IW)
- Choose two images in Read and Read(2) respectively.
- Select IW1 for TOPS-Split and TOPS-Split(2).
- Use GETASSE30 for Back geocoding of Antarctic Area (Use SRTM for scenes with latitude from S60 to N60).
- Add '_IW1' to the output name
- Run and check
- Repeat for IW2 and IW3.
c. (Radar ~ Interferometirc ~ Products ~ ) Interferogram Formation : (25~30 minutes for each IW)
- Run for IW1, IW2, and IW3 separately.
d. (Radar ~ Sentinel-1 TOPS ~ ) S-1 TOPS Deburst : (20 ~ 40 minutes for each IW)
- Run for IW1, IW2, and IW3 separately.
- Try several times or skip if error occurs.
e. (Radar ~ Interferometric ~ Products ~ ) Topographic Phase Removal: (15 ~ 20 minutes for each IW)
- It is available only after Deburst.
- Use GETASSE30 DEM for Antarctic Area (Use SRTM for scenes with latitude from S60 to N60).
- Run for IW1, IW2, and IW3 separately.
f. (Radar ~ Interferometric ~ Filtering ~ ) Goldstein Phase Filtering: (20 ~ 25 minutes for each IW)
- Run for IW1, IW2, and IW3 separately.
g. (Radar ~ Geometric ~ Terrain Correction ~ ) Range-Doppler Terrain Correction: (20 ~ 30 minutes)
- Select all source bands with Ctrl +.
- Run for IW1, IW2, and IW3 separately.
h. Right click the phase image and select "Spatial subset from view"
- Adjust Scene Step X, Y to reduce the file size down to 20 MB (or even 10 MB depending on the computer resources).
- Run for IW1, IW2, and IW3 separately.
i. Right click the image and select "Export image to KMZ"
- Run for IW1, IW2, and IW3 separately.
j. Double click KMZ and see the image in Google Earth.
(Option 1.) (Radar ~ Sentinel-1 TOPS ~ ) S-1 TOPS Merge
- IW1, IW2, and IW3 can be merged in any steps after (d.) Deburst and before (g.) Range-Doppler Terrain Correction
- I recommend to merge after (f.) Goldstein Filtering.
- Add '_IW123' to the output file name.
(Option 2.) (Raster ~ Geometric ~ ) Reprojection
- It occurs error if "S-1 TOPS Merge" is not used previously.
- It can substitute Range-Doppler Terrain Correction.
- Use WGS84 datum for KMZ output.
- Check "Fit to size" and adjust "Pixel Resolution" by 10 x 10 to reduce the output file size.
- Check "Reset" at Output Parameters to set the center coordinates.
(Note 1) Graph Builder doesn't work on my machine. Maybe
4. SNAPHU with Windows VMWare
( Reference: Sentinel-1 Stripmap Interferometry)
a. Download and Install VMWare Workstation 12.1.1 Player for Windows 64-bit operating systems. (http://www.vmware.com)
b. Download ubuntu-16.04.1-desktop-amd64
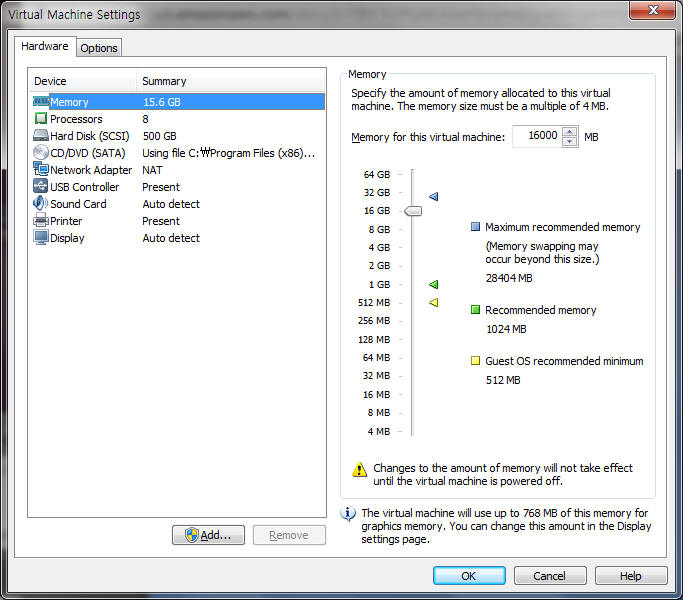
c. In VMWare,
- memory > 8GB (16GB recommended)
- Harddisk ~ 500GB
- Options ~ Shared folders: always enable, ubuntu_data, D:\ubuntu_data

- Create OS using ubuntu iso image (it takes for a while)
- Player ~ Manage ~ Reinstall VMWare Tools -> move *.tar.gz file into Desktop (or Home) -> Search and open Terminal
- In Terminal,
> cd Desktop
> gunzip -c *.tar.gz | tar -xvf -
> sudo ./vmware-install.pl
(Press Enter several times to the end.)
Check if /mnt/hgfs/ubunto_data is created.
d. Download and install SNAPHU
In Terminal,
> sudo apt-get install snaphu
> snaphu
e. Export to SNAPHU
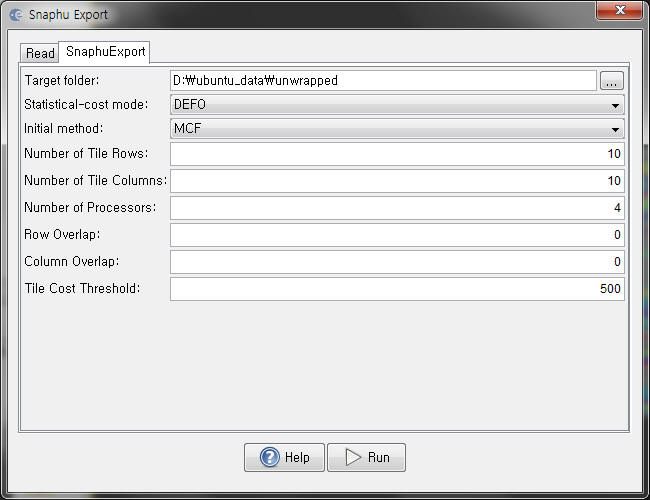
- Save the wrapped interferogram into the shared folder: SNAP ~ Radar ~ Interferometric ~ Unwrapping ~ Snaphu Export
- Statistical-cost mode: Select TOPO for topography, DEFO for deformation.
- Run (Subset the image if it takes forever! Save the subset product to avoid error in data format.)
f. Run SNAPHU
- In Linux Terminal, open snaphu.conf file with more command
> more snaphu.conf
- Copy the command (left mouse dragging), paste it to the command line (middle mouse click) and run (enter).
> q (to quit more)
> snaphu -f snaphu.conf Phase_ifg_srd__06Aug2015_18Aug2015.snaphu.img 64700
- If it takes forever, subset the image.
g. Import the unwrapped interferogram into SNAP.
SNAP ~ Radar ~ Interferometric ~ Unwrapping ~ Snaphu Import
h. Change from unwrapped phase to displacement
SNAP ~ Radar ~ Interferometric ~ Products ~ Phase to Displacement
4. DDInSAR
a. SNAP ~ Raster ~ Band Maths....